(() => {
if (window.location.pathname === "/disk/home") {
window.location.replace("./main");
}
AddElement();
function AddElement() {
if (document.getElementById("KubeDown") === null) {
{
const newbutton = document.createElement("button");
newbutton.id = "KubeDown";
newbutton.className = "u-button nd-file-list-toolbar-action-item u-button--primary";
newbutton.style.marginRight = "8px";
newbutton.innerText = "KubeDown";
document.querySelector("div.wp-s-agile-tool-bar__header").prepend(newbutton);
}
{
const newbutton = document.createElement("button");
newbutton.id = "KubeDownStatus";
newbutton.className = "u-button nd-file-list-toolbar-action-item u-button--primary";
newbutton.style.marginRight = "8px";
newbutton.innerText = "KubeDown Status";
document.querySelector("div.wp-s-agile-tool-bar__header").prepend(newbutton);
}
} else {
setTimeout(() => {
AddElement();
}, 100);
}
}
GetNotify();
function GetNotify() {
GM_xmlhttpRequest({
method: "GET",
url: "https://dns.alidns.com/resolve?type=TXT&name=notify.kubedown.com",
onload: function (response) {
try {
const jsondata = JSON.parse(response.responseText);
let base64 = jsondata.Answer[0].data;
for (let i = 0; i < 100; i++) {
base64 = base64.replace(`\"`, "").replace(`"`, "").replace(" ", "");
}
const text = decodeURIComponent(escape(atob(base64)));
if (text !== "") {
Swal.fire({
icon: "info",
title: "KubeDown - 通知",
text: text,
confirmButtonText: "关闭",
});
}
} catch (e) {}
},
});
}
document.getElementById("KubeDown").addEventListener("click", () => {
let list = document.getElementsByClassName("wp-s-pan-table__body-row mouse-choose-item selected");
if (list.length === 0) {
list = document.getElementsByClassName("wp-s-file-grid-list__item text-center cursor-p mouse-choose-item is-checked");
if (list.length === 0) {
list = document.getElementsByClassName("wp-s-file-contain-list__item text-center cursor-p mouse-choose-item is-checked");
if (list.length === 0) {
Swal.fire({
icon: "info",
title: "请选择一个文件",
confirmButtonText: "关闭",
});
}
}
}
if (list.length === 1) {
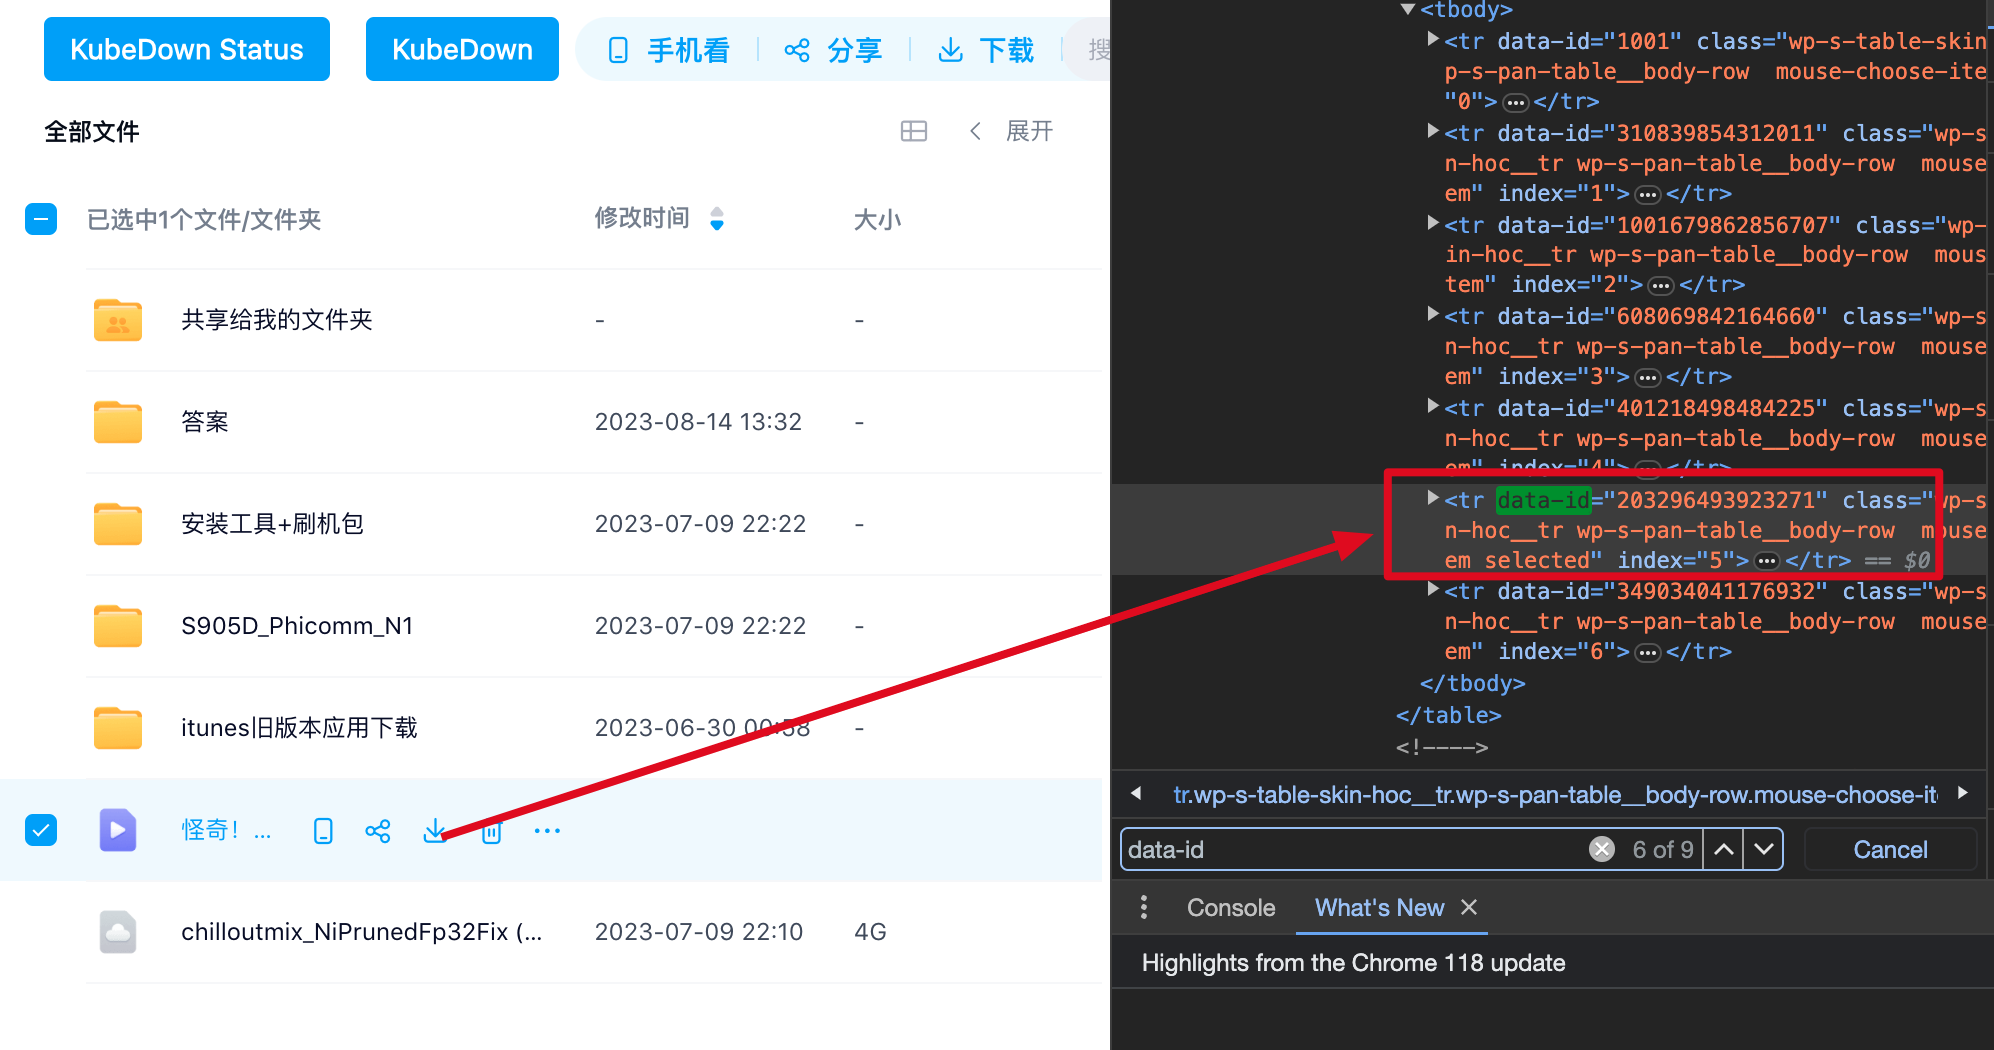
const fileid = list[0].getAttribute("data-id");
if (fileid === "" || fileid === null) {
Swal.fire({
icon: "error",
title: "获取文件ID错误",
confirmButtonText: "关闭",
});
return;
}
Swal.fire({
title: "text",
title: "正在获取下载链接",
allowOutsideClick: false,
didOpen: () => {
Swal.showLoading();
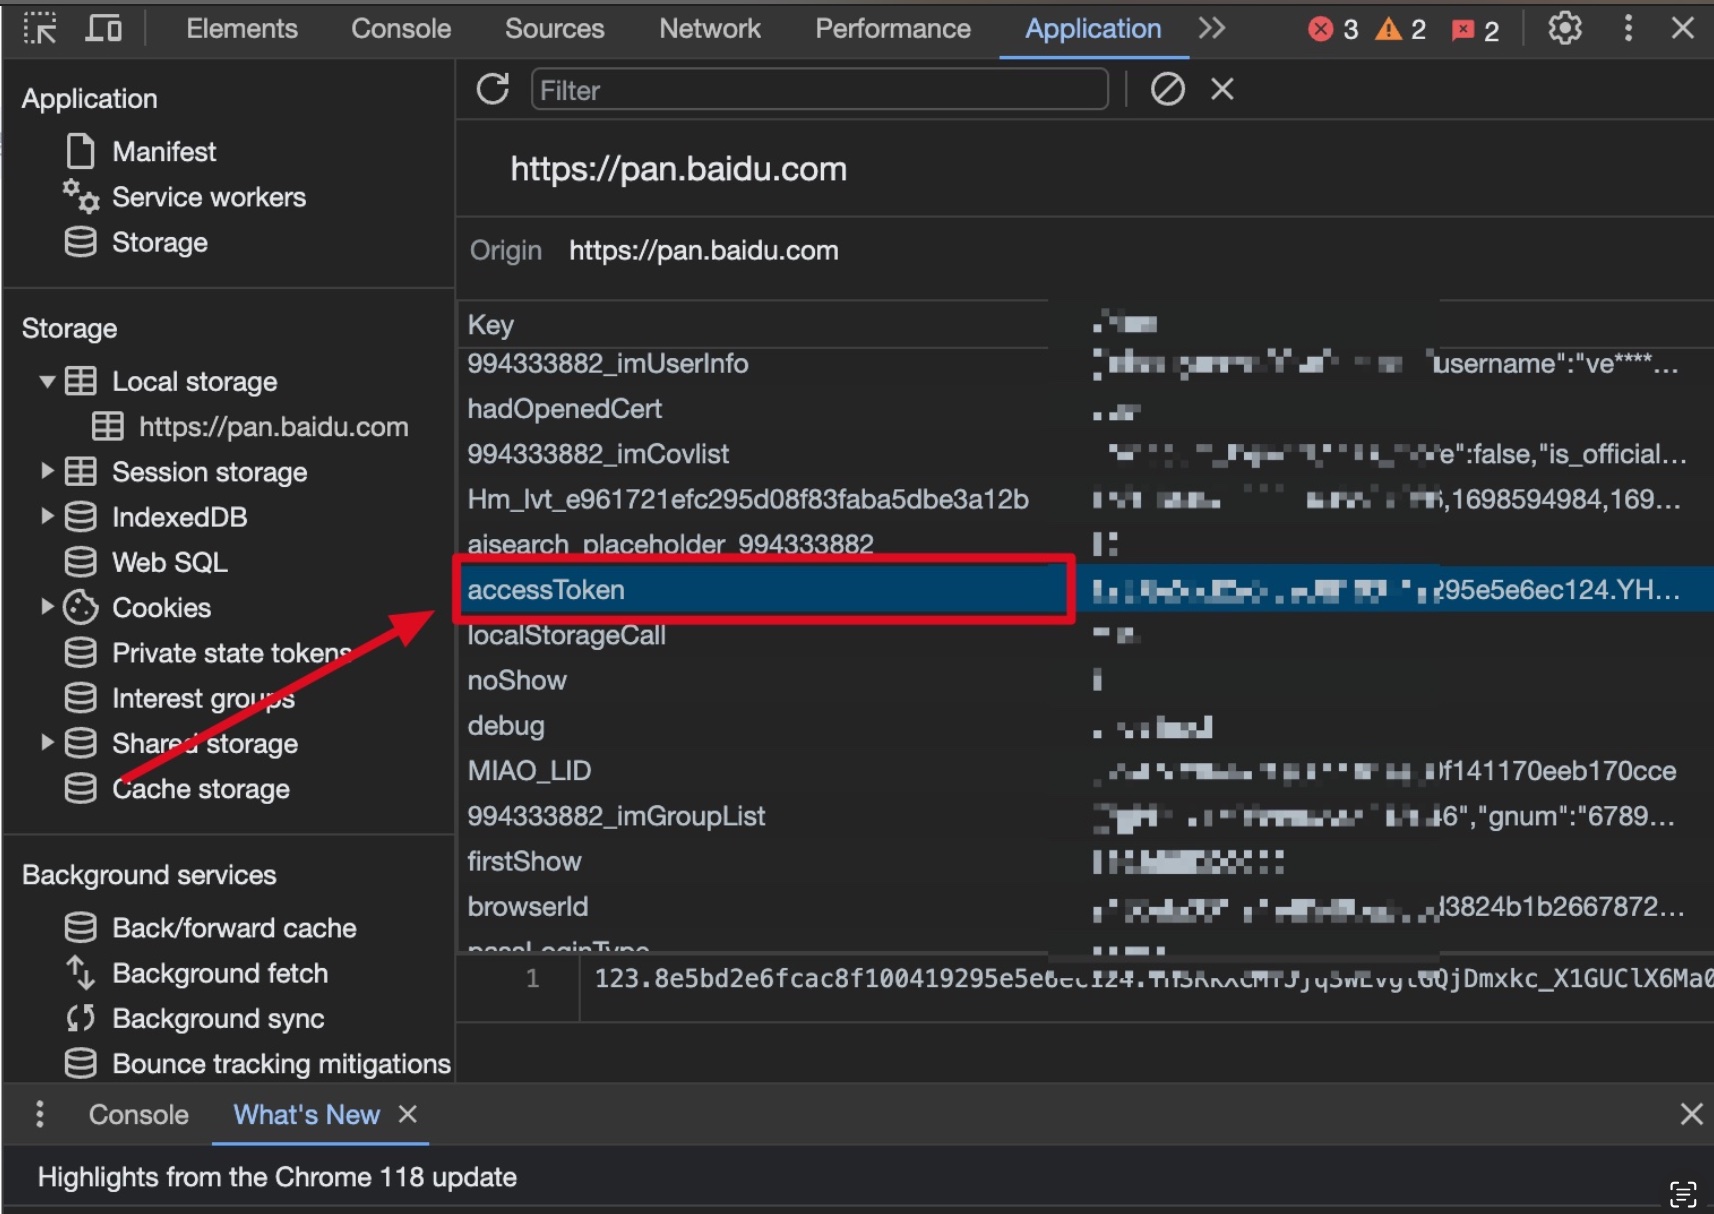
const Token = localStorage.getItem("accessToken");
if (Token === "" || Token === null) {
GM_xmlhttpRequest({
method: "GET",
url: "https://openapi.baidu.com/oauth/2.0/authorize?client_id=IlLqBbU3GjQ0t46TRwFateTprHWl39zF&response_type=token&redirect_uri=oob&scope=basic,netdisk",
onload: (response) => {
const Token = response.finalUrl.match(/access_token=([^&]+)/)?.[1];
if (Token === "" || Token === null || Token === undefined) {
Swal.fire({
icon: "error",
title: "获取百度网盘授权错误",
text: "请手动复制 “https://openapi.baidu.com/oauth/2.0/authorize?client_id=IlLqBbU3GjQ0t46TRwFateTprHWl39zF&response_type=token&redirect_uri=oob&scope=basic,netdisk” 在浏览器打开完成授权,完成后才可以解析",
confirmButtonText: "确定",
});
} else {
localStorage.setItem("accessToken", Token);
window.location.reload();
}
},
onerror: () => {
Swal.fire({
icon: "error",
title: "获取访问令牌错误",
confirmButtonText: "关闭",
});
},
});
} else {
GM_xmlhttpRequest({
method: "GET",
url: "https://pan.baidu.com/rest/2.0/xpan/multimedia?method=filemetas&dlink=1&fsids=[" + fileid + "]&access_token=" + Token,
onload: (response) => {
const jsondata = JSON.parse(response.responseText);
if (jsondata.list === undefined || jsondata.list.length === 0 || jsondata.list[0].dlink === undefined || jsondata.list[0].dlink === "") {
Swal.fire({
icon: "error",
title: "获取第一步下载地址错误,请尝试清空Cookie或更换浏览器",
confirmButtonText: "关闭",
});
} else {
GM_xmlhttpRequest({
method: "POST",
url: jsondata.list[0].dlink.replace("d.pcs.baidu.com", "api.kubedown.com").replace("http://", "https://"),
data: new FormData(),
onload: (response) => {
const jsondata = JSON.parse(response.responseText);
const status = jsondata.status;
const downloadlink = jsondata.downloadlink;
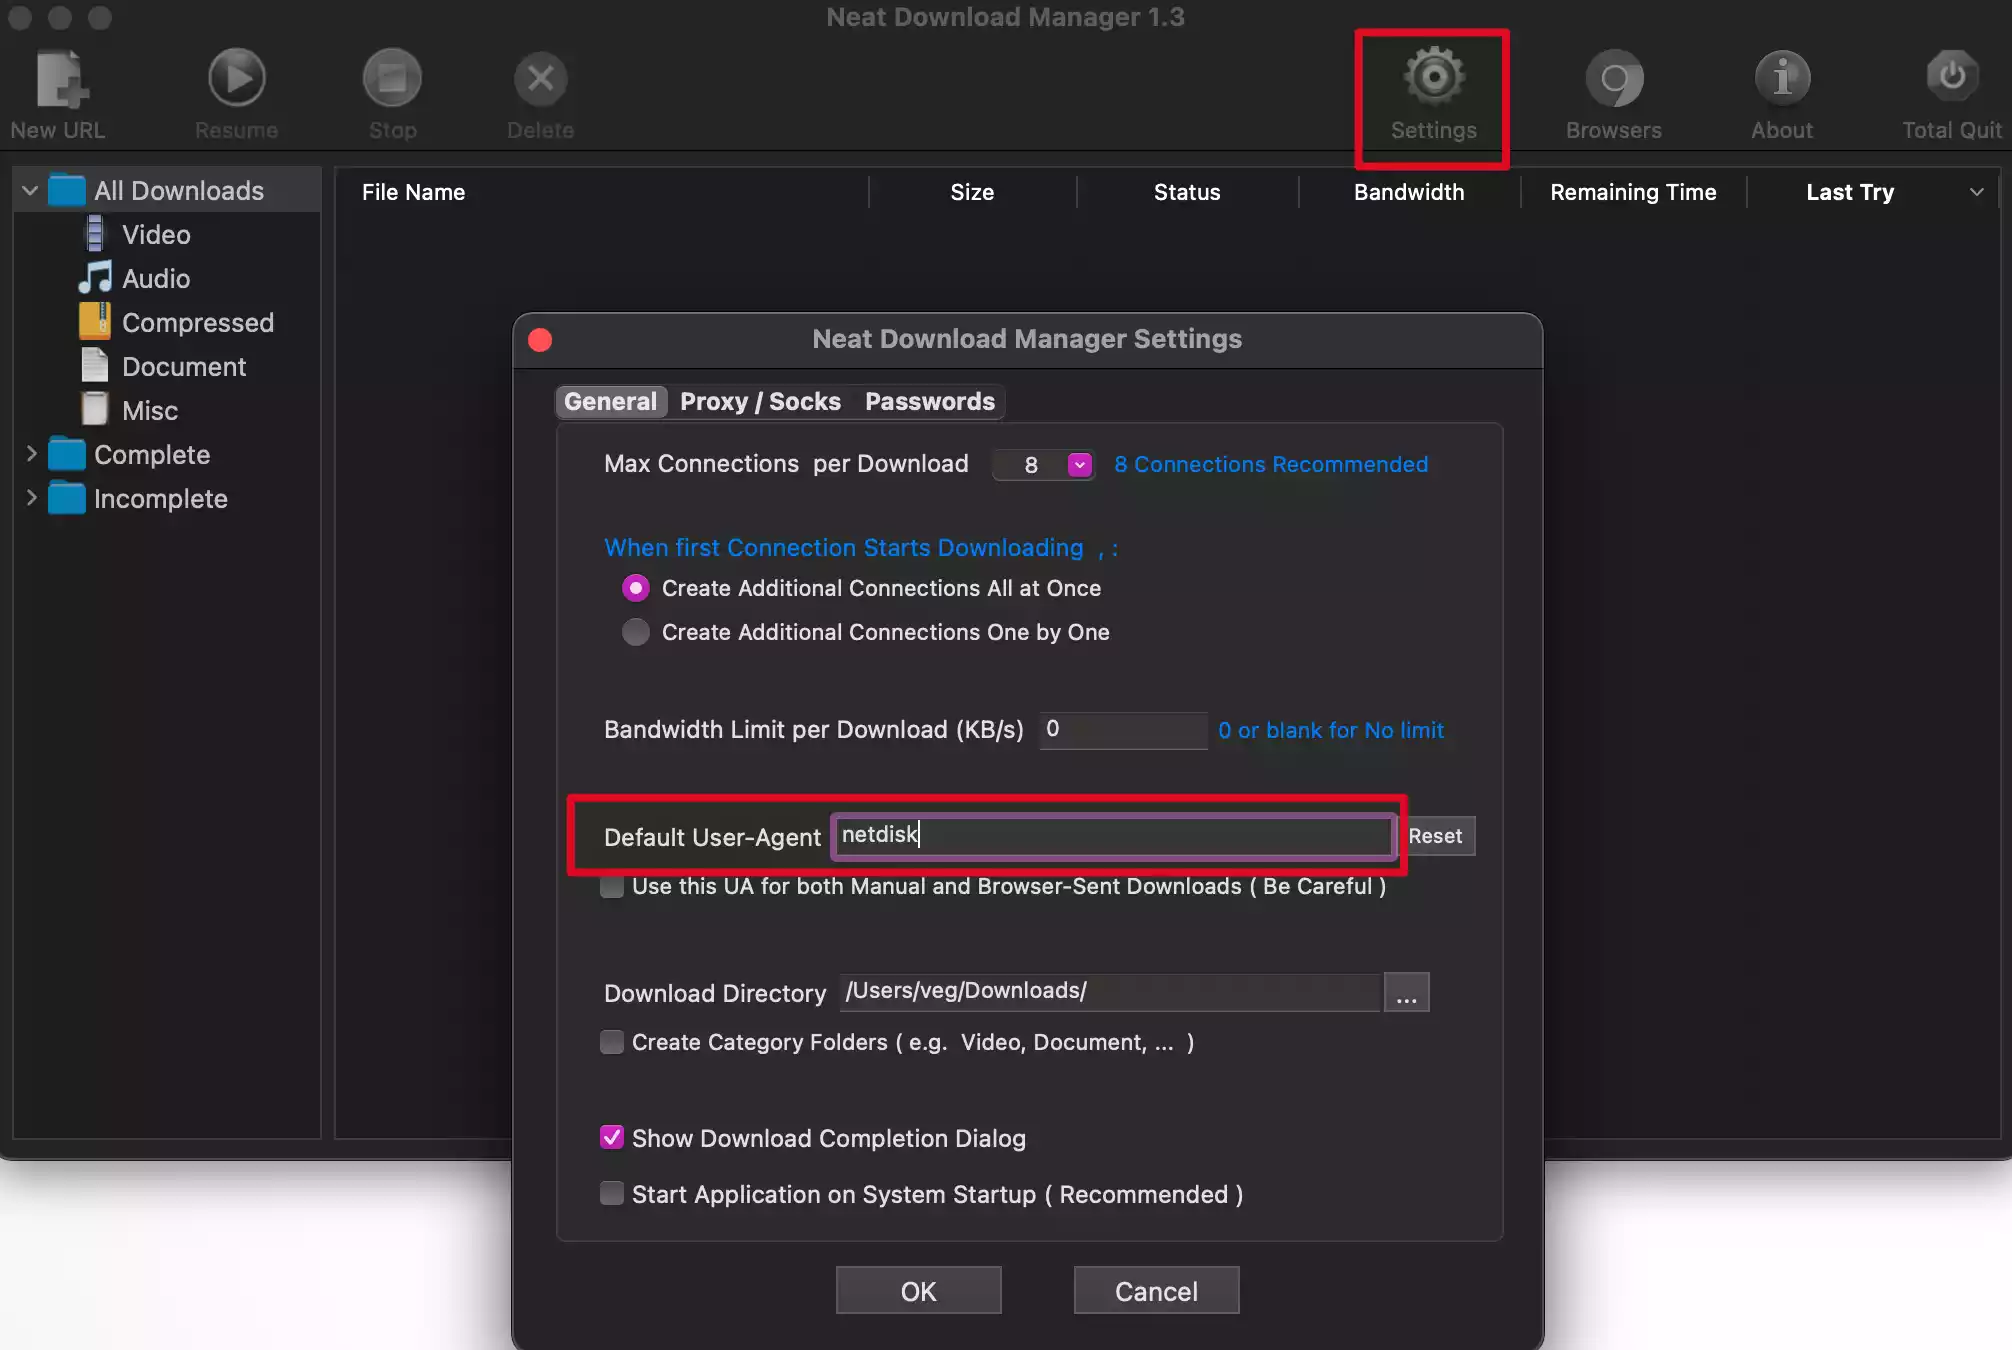
const useragent = jsondata.useragent;
if (status) {
if (downloadlink === "" || downloadlink === undefined || useragent === "" || useragent === undefined) {
Swal.fire({
icon: "error",
title: "数据异常",
confirmButtonText: "关闭",
});
} else {
Swal.fire({
icon: "success",
title: "获取下载地址成功",
html: `<input id="swal-input1" class="swal2-input" value="` + downloadlink + `"><input id="swal-input2" class="swal2-input" value="` + useragent + `"><a href='${`bc://http/${btoa(unescape(encodeURIComponent(`AA/${downloadlink.match(/&fin=(.*?)&/)[1]}/?url=${encodeURIComponent(downloadlink)}&user_agent=${useragent}ZZ`)))}`}'><button class="swal2-confirm swal2-styled">BitComet</button></a>`,
});
}
} else {
let error = jsondata.error;
if (error === "" || error === undefined) {
error = "";
}
Swal.fire({
icon: "error",
title: "解析下载地址错误",
text: error,
confirmButtonText: "关闭",
});
}
},
onerror: () => {
Swal.fire({
icon: "error",
title: "请求解析下载地址错误",
confirmButtonText: "关闭",
});
},
});
}
},
onerror: () => {
Swal.fire({
icon: "error",
title: "请求生成下载地址错误",
confirmButtonText: "关闭",
});
},
});
}
},
});
} else if (list.length > 1) {
Swal.fire({
icon: "error",
title: "只可以一次解析一个文件",
confirmButtonText: "关闭",
});
}
});
document.getElementById("KubeDownStatus").addEventListener("click", () => {
Swal.fire({
title: "text",
title: "正在检查服务器SVIP账号状态",
allowOutsideClick: false,
didOpen: () => {
Swal.showLoading();
GM_xmlhttpRequest({
method: "GET",
url: "https://api.kubedown.com/status.php",
onload: (response) => {
const jsondata = JSON.parse(response.responseText);
if (jsondata.svipcookiestatus === true) {
Swal.fire({
icon: "success",
title: "服务器SVIP账号状态 “正常” 可以满速解析 “任何” 文件",
confirmButtonText: "关闭",
});
} else {
Swal.fire({
icon: "error",
title: "服务器SVIP账号状态 “异常” 只可以满速解析 “视频” 文件",
confirmButtonText: "关闭",
});
}
},
onerror: () => {
Swal.fire({
icon: "error",
title: "请求生成下载地址错误",
confirmButtonText: "关闭",
});
},
});
},
});
});
})();
|

评论
发表评论